Tampilkan postingan dengan label Cocoa Touch. Tampilkan semua postingan

Kamis, 14 Oktober 2010

Outlets, Cocoa vs. Cocoa Touch

I almost always follow Apple's lead on Cocoa and Cocoa Touch conventions. I figure that by the time outside developers like me see something for the first time, Apple engineers have been living with that thing for many months, so they've likely got a much better idea than I do about the best way to use that new thing.

But, after spending time with their stuff, sometimes — not often, but sometimes — I disagree with what appears to be Apple's recommended "best practice" for doing something. I think I've come to the decision that the IBOutlet behavior in iOS is one of these areas.

If you look at Apple's documentation snippets and sample code, you find that they almost always retain IBOutlet properties, like:


#import <UIKit/UIKit.h>


@interface FooView : UIView
{

}

@synthesize (nonatomic, retain) IBOutlet UIButton button;
@synthesize (nonatomic, retain) IBOutlet UITextField textField;
@synthesize (nonatomic, retain) IBOutlet UIImageView imageView;
@end


There's a good reason for this. In iOS, the documentation explicitly states that you need to retain all outlets because the bundle loader for iOS autoreleases all objects created as a result of loading a nib.
Objects in the nib file are created with a retain count of 1 and then autoreleased. As it rebuilds the object hierarchy, however, UIKit reestablishes connections between the objects using the setValue:forKey: method, which uses the available setter method or retains the object by default if no setter method is available. If you define outlets for nib-file objects, you should always define a setter method (or declared property) for accessing that outlet. Setter methods for outlets should retain their values, and setter methods for outlets containing top-level objects must retain their values to prevent them from being deallocated. If you do not store the top-level objects in outlets, you must retain either the array returned by the loadNibNamed:owner:options: method or the objects inside the array to prevent those objects from being released prematurely.

This is different from Cocoa on the Mac, where it wasn't necessary to retain outlets and people rarely did. In fact, we didn't usually bother with accessor or mutator methods for outlets (it was just unnecessary extra typing in most cases), we just put the IBOutlet keyword in front of the instance variable and the nib loader was happy to attach our outlets like that, retaining the objects that needed retaining.

The behavior under Cocoa/Mac is not actually to retain everything in the nib, but rather, to retain any object that doesn't have a parent object to retain it. So, in other words, if an object in a nib will be retained by something else, like a superview, the nib loader doesn't bother to retain it again. But, if it doesn't, the bundle loader retains it so that it doesn't get deallocated.

This is a logical approach and, in fact, was necessary back in the pre-Objective-C 2.0 days because outlets back then were just iVars and there was no easy way for the controller class to retain objects that needed to be retained.

I have to wonder why they would change the fundamental behavior of a foundation object like NSBundle between Mac OS and iOS? NSBundle is not part of Cocoa or Cocoa Touch, it's part of Foundation, and the whole point of Foundation is to have common objects between the different operating systems.

I wrote a small project to test if the Bundle Loader really did behave differently, as documented, by using an instance of UIView in the nib with no superview. Sure enough, when I didn't retain the outlet, I either got an EXC_BAD_ACCESS or a different object altogether when I printed the outlet to NSLog(). The difference is real. The bundle loader on the Mac will retain outlets for you if they need to be retained, which allows you to continue using instance variables, or properties with the assign keyword. This means you don't have to release your outlets in dealloc and you don't have to mess around with anything like viewDidUnload on iOS.

The bundle loader on the iOS, on the other hand, does not retain anything for you, so if an object does not have a parent object to retain it, you have to retain it in your controller class or you will end up with an invalid outlet.

I really don't see the value in changing this behavior. I'm guessing the decision was made for the sake of memory efficiency in the early days of the iPhone. The idea being that you might load a nib with object instances that you aren't actually using, and with the old behavior, those would take up memory as long as the nib was loaded. That doesn't necessarily sound like a good idea on an embedded device with no virtual memory and 128 megs of RAM, which is what the original iPhone and iPhone 3G had.

Despite that, I think the cure here is worse than the disease. If you don't remember to release your outlets in viewDidUnload (which, if I remember right, we couldn't even do in the 2.0 version of the SDK), your outlets will continue to use up memory after the nib is unloaded, obviating any advantage of the lazy loading. Essentially, it's more fragile, because it depends on the programmer doing the right thing and there are few if any situations where a programmer would need to not do the right thing.

By virtue of the bundle loader not retaining outlets, it also requires more rote, boilerplate code to be written in every controller class in every iOS application, yet it runs just as much of a risk of unnecessary memory use, arguably a greater risk. In other words, the cure is no better than the disease.

iPhones are getting more robust and less memory constrained with every new device that comes out. I would argue that it's already time (or, at very least, soon will be time), to bring the behavior of the two bundle loaders together. If they are brought together, they should be brought together using the old Cocoa behavior not the new iOS behavior. When you think of the number of people coding for the iOS now, those extra required dealloc and viewDidUnload lines in every single controller class in every single iOS application are really adding up to a lot of engineering hours lost on boilerplate.

A few weeks ago, I started experimenting with using assign instead of retain for IBOutlets except in cases where the outlet's object didn't have a superview or another object retaining it. If an outlet's not a view or control, then I also use retain. In essence, I'm mimicking the old behavior of the nib in designing my controller classes.

This has led to a lot less typing and less code to maintain because 95% or more of the outlets I create are connected to objects retained by their superview during the entire existence of the controller class.

Now, I'm not necessarily saying you should do what I'm doing. It can be tricky, at times, remembering which objects need to be retained and they can be hard to debug if you get it wrong. Apple has made a recommendation with good reason and I don't think you should disregard that recommendation lightly. That being said, if you're comfortable enough with Objective-C memory management and the bundle loader to be able to distinguish when a nib object will be automatically retained by something else, you could save yourself a fair bit of typing over time.

I normally try to embrace changes Apple makes, but in this case, I just can't convince myself that this was a good change. The old nib behavior of retaining only things that need retaining has been in use for over 20 years, dating back to when desktop computers were less powerful than our iPhones are, and there doesn't appear to be any practical advantage to the change. On the other hand, we'd all benefit from going back to the old Mac OS bundle behavior because we'd have less make-work to do when setting up a controller class. There's also little danger in changing this behavior because code that follows Apple's current recommendations would continue to work correctly.

Rabu, 19 Mei 2010

Improved Gradient Buttons

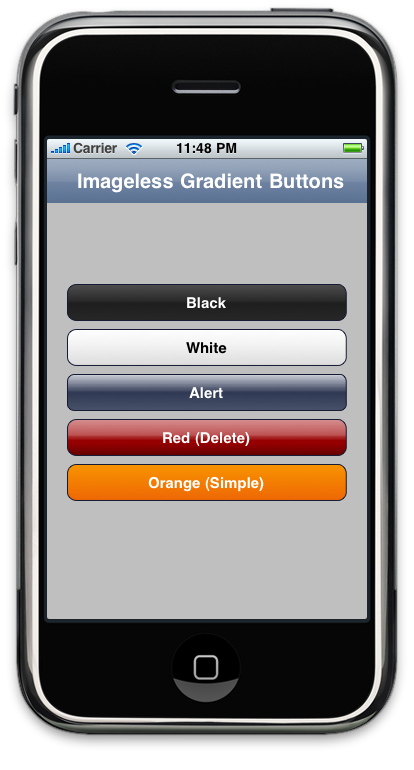
I've been playing around a bit, improving my imageless gradient button class. The new version allows you to specify the gradient for the normal and highlighted state by populating two arrays, one with the colors that make up the gradients and another with the relative location for each color. I've gotten rid of the abstract parent class and individual child classes and all the functionality is now contained in a single class.

Screen shot 2010-05-19 at 11.48.50 PM.png
There are five built-in styles which can be seen in the image above, or you can manually set the gradient to any value you'd like. You can download the source codes from the Google code page. There are no restrictions or limitations on its use.

The easiest way to use these is to add a UIButton instance to your view in Interface Builder, then change the underlying class from UIButton to GradientButton. Because there's no way to create IB palettes for iPhone classes, you'll also have to implement viewDidLoad and set the gradient or use the existing methods there.

Jumat, 16 Oktober 2009

Accessorizer 1.5

I've posted about Accessorizer before. It's just been updated to version 1.5, incorporating a new feature that sprang out of a feature request that was made by yours truly. Actually, it was more of an off-hand comment then a feature request, but Kevin Callahan, the brains behind Accessorizer liked the request and jumped on it with gusto.

The new feature? Accessorizer now has the ability to auto-detect classes that are commonly used as outlets and, if you want it to, will add the IBOutlet keyword automatically to the generated property statements. I've been beta testing this new functionality, and works pretty darn well.

If you do any significant amount of Objective-C programming and haven't tried Accessorizer, I'd really suggest giving it a try. In the application I wrote today for More iPhone 3 Development, I'd estimate that Accessorizer saved me at least five minutes of typing (not to mention greatly reduced the chances of mistakes and typos). I typed in only my instance variables, then a few short keystrokes and about twenty seconds later, I had my property declarations complete with IBOutlet keyword where needed, @synthesize declarations, and both NSCoding methods. You don't have to write too many classes for it to pay for itself if you do this for a living. If you're a hobbyist then, in a way, your time is even more valuable.

And if you're not sure how to use it, or why you would use it, check out the Accessorizer videos in the lower right of the home page.

Minggu, 12 Juli 2009

A Category on NSDate

Here is a category on NSDate that makes a few somewhat common tasks that require several lines of code and turns them into a single method all. Among these methods are one that takes a date with a datetime value and turns it into a date without time, a method that calculates a new dates that is a certain number of days after the date, and a method that calculates the difference between two dates given in days.

Nothing earth-shattering, but may save you a few lines of code here and there.

NSDate-Misc.h
#import <Foundation/Foundation.h>
@interface NSDate(Misc)
+ (NSDate *)dateWithoutTime;
- (NSDate *)dateByAddingDays:(NSInteger)numDays;
- (NSDate *)dateAsDateWithoutTime;
- (int)differenceInDaysTo:(NSDate *)toDate;
- (NSString *)formattedDateString;
- (NSString *)formattedStringUsingFormat:(NSString *)dateFormat;
@end


NSDate-Misc.m
#import "NSDate-Misc.h"

@implementation NSDate(Misc)
+ (NSDate *)dateWithoutTime
{
return [[NSDate date] dateAsDateWithoutTime];
}

-(NSDate *)dateByAddingDays:(NSInteger)numDays
{
NSCalendar *gregorian = [[NSCalendar alloc] initWithCalendarIdentifier:NSGregorianCalendar];

NSDateComponents *comps = [[NSDateComponents alloc] init];
[comps setDay:numDays];

NSDate *date = [gregorian dateByAddingComponents:comps toDate:self options:0];
[comps release];
[gregorian release];
return date;
}

- (NSDate *)dateAsDateWithoutTime
{
NSString *formattedString = [self formattedDateString];
NSDateFormatter *formatter = [[NSDateFormatter alloc] init];
[formatter setDateFormat:@"MMM dd, yyyy"];
NSDate *ret = [formatter dateFromString:formattedString];
[formatter release];
return ret;
}

- (int)differenceInDaysTo:(NSDate *)toDate
{
NSCalendar *gregorian = [[NSCalendar alloc] initWithCalendarIdentifier:NSGregorianCalendar];

NSDateComponents *components = [gregorian components:NSDayCalendarUnit
fromDate:self
toDate:toDate
options:0
]
;
NSInteger days = [components day];
[gregorian release];
return days;
}

- (NSString *)formattedDateString
{
return [self formattedStringUsingFormat:@"MMM dd, yyyy"];
}

- (NSString *)formattedStringUsingFormat:(NSString *)dateFormat
{
NSDateFormatter *formatter = [[NSDateFormatter alloc] init];
[formatter setDateFormat:dateFormat];
NSString *ret = [formatter stringFromDate:self];
[formatter release];
return ret;
}

@end

Rabu, 01 Juli 2009

What, Me Teach?

Yes, believe it or not, it looks like I will be teaching.

I've agreed to be the instructor for a three-day iPhone Boot Camp NYC Workshop that runs from August 14-16. Future workshops (both in New York and other places) are a possibility if I don't incite a riot or do a really horrible job teaching this one.

I'm actually really excited about doing this. The iPhone Boot Camp program is a great program and I'm looking forward to being a part of it. The ink is still fresh on the deal (I'm not even listed as an instructor on their web page yet), so I don't have many details right now, but I can tell you that this particular workshop is targeted at new iPhone developers who do have some basic programming knowledge (or, basically, the same people that our book is targeted at). So, if you live in or near the NYC Metro area and are interested in becoming an iPhone developer, I'd love to have you in my workshop.

If things work out well, I'm hoping to convince them to offer a more advanced workshop or maybe even an OpenGL / Gaming workshop in the future. Let me know if you're interested in either of those topics and, if so, where you live.

About the only other thing I know at this point is that I will be tweaking the syllabus that's on their website just a bit to update it for 3.0 and to match my own teaching style. Other than that, details will be forthcoming once I know them.

Core Data - Determining if a Managed Object is New

Sorry for the dearth of OpenGL ES posts. Things are quite hectic now with writing More iPhone Development, and I'm not even fully caught up from the week spent at WWDC. So, it may be a little while before I'm able to get another substantive post out like another OpenGL ES tutorial.

Anyone working with Core Data may appreciate this short category I wrote, with some help from Jim Dovey. Curiously enough, managed objects don't know if they are new or not. That is to say, whether they've been added to the context since the last load or save. I've found this to be a piece of information I've needed a lot, so wrapped up the check into a category.

NSManagedObject-isNew.h

//
// NSManagedObject-IsNew.h

#import <Foundation/Foundation.h>


@interface NSManagedObject(IsNew)
/*!
@method isNew
@abstract Returns YES if this managed object is new and has not yet been saved yet into the persistent store.
*/

-(BOOL)isNew;
@end


NSManagedObject-isNew.m

//
// NSManagedObject-IsNew.m
//

#import "NSManagedObject-IsNew.h"


@implementation NSManagedObject(IsNew)
-(BOOL)isNew
{
NSDictionary *vals = [self committedValuesForKeys:nil];
return [vals count] == 0;
}

@end


Then you can just add these files to your project, #import the header file, and then you can ask any managed object if it's new by sending it an isNew message.

Selasa, 02 Juni 2009

Runtime Madness

There was a fascinating discussion on Twitter this morning regarding the modern runtimes featured on 64-bit Macs and on the iPhone. One of the features of the new runtime is automatic creation of instance variables for your properties. So, for example, this is a perfectly valid class for 64-bit Mac programs:

#import <Cocoa/Cocoa.h>

@interface TestController : NSObject {

}

@property (retain) NSString *testString;
@end


Notice that there's no instance variable declaration for testString; it's not needed. Now that the fragile base class problem has been eliminated in the modern ABI, the runtime is capable of doing this work for us.

This works on the iPhone also. Unfortunately, though, the iPhone simulator is a 32-bit Mac application, which means programs running in the simulator cannot take advantage of this feature. In other words, the following class is a perfectly valid class when compiled for the iPhone device, but will fail with errors when compiled against the simulator:

#import <UIKit/UIKit.h>

@interface HeroEditViewController : UITableViewController {
}

@property (nonatomic, retain) NSManagedObject *myObject;
@end


You could use this feature on the iPhone, but not on the simulator by doing this:

#import <UIKit/UIKit.h>

@interface HeroEditViewController : UITableViewController {
#if TARGET_IPHONE_SIMULATOR
NSManagedObject *myObject;
#endif
}

@property (nonatomic, retain) NSManagedObject *myObject;
@end


But, there's a catch. The modern ABI doesn't allow access to @private instance variables, and the instance variables created for you by the runtime are @private. That means you cannot access the underlying, undeclared instance variable from within your own class. You have to use the accessor method everywhere.

So, what's the advantage of not declaring the underlying instance variable? If you're writing a 64-bit Mac application, it can save you a fair bit of typing. On the iPhone, it doesn't save you any typing at all, in fact, it adds two lines of code unless you never, ever use the simulator. That means that for most iPhone developers, there really is no advantage to using feature right now. In the future, it is possible, and maybe even likely that there will be compiler optimizations that can happen only if you've you've let the runtime create your instance variables for you, however.

Craig Hockenberry has opened a bug report to request that the iPhone simulator be changed to use a modern runtime (without changing the datatype sizes to 64-bit sizes, of course). If you'd like to be able to have your instance variables synthesized, you might want to dupe his report. The more developers who report a specific bug or feature request, the more likely Apple is to look at implementing the requested fix or feature.

If you're wondering if you should use this new feature in your iPhone applications, there's really no one answer. There's absolutely no guarantee that there will ever be any advantage to using this on the iPhone. Unless you don't use the simulator at all, you still have to declare the instance variables when compiling for the simulator, so it doesn't save you any typing. It's a gamble, so feel free to use it you want, but there's certainly no compelling reason to use it yet.

I would, though, start moving away from direct instance variable access when using properties. At some point, it will probably make sense to use this feature, and you'll be stuck updating a lot of code if you directly access your instance variables.

Thanks to @bbum, @borkware, @chockenberry and the rest of the Cocoa geeks who participated in the educational discussion!

Note: If you want to experiment with this on a Mac program, here are the configuration options in Xcode's project you'll need to change so that you're not also building a 32-bit version (for which the instance variables can't be synthesized) - click for larger versions (there are two pictures):


Jumat, 17 April 2009

OpenGL ES From the Ground Up, Part 1: Basic Concepts

I've done a number of postings on programming OpenGL ES for the iPhone, but most of the posts I've done have been targeted at people who already know at least a little bit about 3D programming.

If you haven't already done so, grab a copy of my Empty OpenGL Xcode project template. We'll use this template as a starting point rather than Apple's provided one. You can install it by copying the unzipped folder to this location:
/Developer/Platforms/iPhoneOS.platform/Developer/Library/Xcode/Project Templates/Application/
There are a number of good tutorials and books on OpenGL. Unfortunately, there aren't very many on OpenGL ES, and none (at least as I write this) that are specifically designed for learning 3D programming on the iPhone. Because most available material for learning OpenGL starts out teaching using what's called direct mode, which is part of the functionality of OpenGL that's not in OpenGL ES, it can be really hard for an iPhone dev with no 3D background to get up and running using existing books and tutorials. I've had a number of people request it, so I've decided to start a series of blog posts designed for the absolute 3D beginner. This is the first in that series. If you've read and understood my previous OpenGL postings, you will probably find this series to be a little too basic.

OpenGL Datatypes


The first thing we'll talk about are OpenGL's datatypes. Because OpenGL is a cross-platform API, and the size of datatypes can vary depending on the programming language being used as well as the underlying processor (64-bit vs. 32-bit vs 16-bit), OpenGL declares its own custom datatypes. When passing values into OpenGL, you should always use these OpenGL datatypes to make sure that you are passing values of the right size or precision. Failure to do so could cause unexpected results or slowdowns caused by data conversion at runtime. Every implementation of OpenGL, regardless of platform or language, declares the standard OpenGL datatypes in such a way that they will be the same size on every platform, making porting OpenGL code from one platform to another easier.

Here are the OpenGL ES datatypes:
  • GLenum: An unsigned integer used for GL-specific enumerations. Most commonly used to tell OpenGL the type of data stored in an array passed by pointer (e.g. GL_FLOAT) to indicate that the array is made up of GLfloats.
  • GLboolean: Used to hold a single boolean values. OpenGL ES also declares its own true and false values (GL_TRUE and GL_FALSE) to avoid platform and language differences. When passing booleans into OpenGL, use these rather than YES or NO (though it won't hurt if you accidentally use YES or TRUE since they are actually defined the same. But, it's good form to use the GL-defined values.
  • GLbitfield: These are four-byte integers used to pack multiple boolean values (up to 32) into a single variable using bitwise operators. We'll discuss this more the first time we use a bitfield variable, but you can read up on the basic idea over at wikipedia
  • GLbyte: A signed, one-byte integer capable of holding a value from -128 to 127
  • GLshort: A signed two-byte integer capable of holding a value between −32,768 to 32,767
  • GLint: A signed four-byte integer capable of holding a value between −2,147,483,648 and 2,147,483,647
  • GLsizei: A signed, four-byte integer used to represent the size (in bytes) of data, similar to size_t in C.
  • GLubyte: An unsigned, one-byte integer capable of holding a value between 0 and 255.
  • GLushort: An unsigned, two-byte integer capable of holding a value between 0 and 65,535
  • GLuint: An unsigned, four-byte integer capable of holding a value between 0 and 4,294,967,295
  • GLfloat: A four-byte precision IEEE 754-1985 floating point variable.
  • GLclampf: This is also a four-byte precision floating point variable, but when OpenGL uses GLclampf, it is indicating that the value of this particular variable should always be between 0.0 and 1.0.
  • GLvoid: A void value used to indicate that a function has no return value, or takes no arguments.
  • GLfixed: Fixed point numbers are a way of storing real numbers using integers. This was a common optimization in 3D systems used because most computer processors are much faster at doing math with integers than with floating-point variables. Because the iPhone has vector processors that OpenGL uses to do fast floating-point math, we will not be discussing fixed-point arithmetic or the GLfixed datatype.
  • GLclampx: Another fixed-point variable, used to represent real numbers between 0.0 and 1.0 using fixed-point arithmetic. Like GLfixed, we won't be using or discussing this datatype.

OpenGL ES (at least the version used on the iPhone) does not support any 8-byte (64-bit) datatypes such as long or double. OpenGL does have these larger datatypes, but given the screen size of most embedded devices, and the types of applications you are likely to be writing for them, the decision was made to exclude them from OpenGL ES under the assumption that there would be little need for them, and that their use could have a detrimental effect on performance.

The Point or Vertex


The atomic unit in 3D graphics is called the point or vertex. These represent a single spot in three dimensional space and are used to build more complex objects. Polygons are built out of these points, and objects are built out of multiple polygons. Although regular OpenGL supports many types of polygons, OpenGL ES only supports the use of three-sided polygon, (aka triangles).

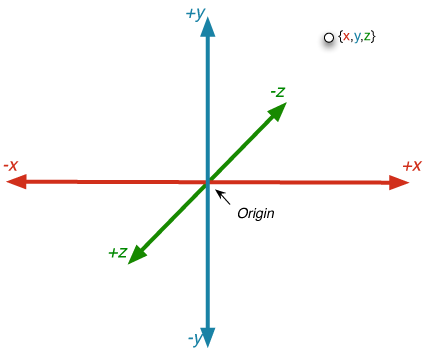
If you remember back to high-school geometry, you probably remember something called Cartesian Coordinates. The basic idea is that you select an arbitrary point in space and call it the origin. You can then designate any point in space by referencing the origin and using three numbers, one for each of the three dimensions, which are represented by three imaginary lines running through the origin. The imaginary line running from left to right is called the x-axis. Traveling along the x-axis, as you go to the right along the x axis, the value gets higher and as you go to the left, they get lower. Left of the origin are negative x values, and to the right are positive x values. The other two axes work exactly the same way. Going up along the y axis, the value of y increases, and going down, it decreases. Values above the origin have a positive y value, and those below the origin have a negative y value. With z, as objects move away from the viewer, the value gets lower, and as they move toward the viewer (or continue behind the viewer), values get higher. Points that are in front of the origin have a positive z value, and those that are behind the origin have a negative z value. The following illustration might make help those words make a little more sense:
cartesian.png

Note: Core Graphics, which is another framework for doing graphics on the iPhone uses a slightly different coordinate system in that the y axis decreases as it goes up from the origin, and increases as it goes down.


The value that increases or decreases along these axes are in an arbitrary scale - they don't represent any real measurement, like feet, inches, or meters. You can select any scale that makes sense for your own programs. If you want to design a game where each unit is a foot, you can do that. if you want to make each unit a micron, you can do that as well. OpenGL doesn't care what they represent to the end user, it just thinks of them as units, and make sure they are all equal distances.

Since any object's location in three-dimensional space can be represented by three values, an object's position is generally represented in OpenGL by the use of three GLfloat variables, usually using an array of three floats, where the first item in the array (index 0) is the x position, the second (index 1) is the y position, and the third (index 2) is the z position. Here's a very simple example of creating a vertex for use in OpenGL ES:

    GLfloat vertex[3];
vertex[0] = 10.0; // x
vertex[1] = 23.75; // y
vertex[2] = -12.532; // z


In OpenGL ES, you generally submit all the vertices that make up some or all of the objects in your scene as a vertex array. A vertex array is simply an array of values (usually GLfloats) that contains the vertex data for some or all of the objects in the world. We'll see how that process works in the next post in this series, but the thing to remember about vertex arrays is that their size is based on the number of vertices being submitted multiplied by either three (for drawing in three-dimensional space) or two (for drawing in two-dimensional space). So, a vertex array that holds six triangles in three-dimensional space would consist of an array of 54 GLfloats, because each triangle has three vertices, and each vertex has three coordinates and 6 x 3 x 3 = 54.

Dealing with all these GLfloats can be a pain, however, because you're constantly having to multiply things in your head and try to think of these arrays in terms of the vertices and polygons that they represent. Fortunately, there's an easier way. We can define a data structure to hold a single vertex, like this:

typedef struct {
GLfloat x;
GLfloat y;
GLfloat z;
}
Vertex3D;

By doing this, our code becomes much more readable:

Vertex3D vertex;
vertex.x = 10.0;
vertex.y = 23.75;
vertex.z = -12.532;

Now, because our Vertex3D struct is comprised of three GLfloats, passing a pointer to a Vertex3D is exactly the same as passing a pointer to an array of three GLfloats. There's no difference to the computer; both have the same size and the same number of bytes in the same order as OpenGL expects them. Grouping the data into these data structures just makes it easier for us as the programmer to visualize and deal with the data. If you download my Xcode template from the beginning of this article, this data structure and the supporting functions I'm going to be discussing next have already been defined in the file named OpenGLCommon.h. There is also an inline function for creating single vertices:

static inline Vertex3D Vertex3DMake(CGFloat inX, CGFloat inY, CGFloat inZ)
{
Vertex3D ret;
ret.x = inX;
ret.y = inY;
ret.z = inZ;
return ret;
}


If you remember back to geometry (or maybe you don't, which is okay), the distance between two points on a plane is calculated using this formula:

distance formula.png


We can implement this formula to calculate the straight-line distance between any two points in three-dimensional space with this simple inline function:

static inline GLfloat Vertex3DCalculateDistanceBetweenVertices (Vertex3D first, Vertex3D second)
{
GLfloat deltaX = second.x - first.x;
GLfloat deltaY = second.y - first.y;
GLfloat deltaZ = second.z - first.z;
return sqrtf(deltaX*deltaX + deltaY*deltaY + deltaZ*deltaZ );
}
;


Triangles


Since OpenGL ES only supports triangles, we can also create a data structure to group three vertices into a single triangle object.

typedef struct {
Vertex3D v1;
Vertex3D v2;
Vertex3D v3;
}
Triangle3D;


Again, a single Triangle3D is exactly the same as an array of nine GLfloats, it's just easier for us to deal with it in our code because we can build objects out of vertices and triangles rather than out of arrays of GLfloats.

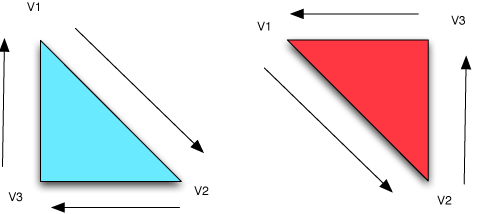
There are a few more things you need to know about triangles, however. In OpenGL, there is a concept known as winding, which just means that the order in which the vertices are drawn matters. Unlike objects in the real world, polygons in OpenGL do not generally have two sides to them. They have one side, which is considered the front face, and a triangle can only be seen if its front face if facing the viewer. While it is possible to configure OpenGL to treat polygons as two-sided, by default, triangles have only one visible side. By knowing which is the front or visible side of the polygon, OpenGL is able to do half the amount of calculations per polygon that it would have to do if both sides were visible.

Although there are times when a polygon will stand on its own, and you might very well want the back drawn, usually a triangle is part of a larger object, and one side of the polygon will be facing the inside of the object and will never be seen. The side that isn't drawn is called a backface, and OpenGL determines which is the front face to be drawn and which is the backface by looking at the drawing order of the vertices. The front face is the one that would be drawn by following the vertices in counter-clockwise order (by default, it can be changed). Since OpenGL can determine easily which triangles are visible to the user, it can use a process called Backface Culling to avoid doing work for polygons that aren't facing the front of the viewport and, therefore, can't be seen. We'll discuss the viewport in the next posting, but you can think of it as the virtual camera, or virtual window looking into the OpenGL world.

winding.png


In the illustration above, the cyan triangle on the left is a backface and won't be drawn because the order that the vertices would be drawn in relation to the viewer is clockwise. On the other hand, the triangle on the right is a frontface that will be drawn because the order of the vertices is counter-clockwise in relation to the viewer.

In the next posting in this series, we'll look at setting up the virtual world in OpenGL and do some simple drawing using Vertex3D and Triangle3D. In the post after that, we'll look at transformations which are a way of using linear algebra to move objects around in the virtual world.

Rabu, 08 April 2009

Clark Cox on VLAs

Clark S. Cox, III, a Cocoa developer and fairly frequent contributor to the cocoa-dev mailing list, points out a major flaw in C99's variable length arrays (VLAs) on his blog today. While it is nice to be able to allocate arrays on the stack, I'm with Clark on this one: use malloc() (or one of its brethren like calloc()) followed by free() for any potentially large arrays so you don't have to worry about undefined behavior when your array is too big to fit on the stack.

Now, excuse me, I've got to check some code where I think I used VLAs for potentially large arrays.

 
Design by Free WordPress Themes | Bloggerized by Lasantha - Premium Blogger Themes | Lady Gaga, Salman Khan